
So, we all heard the buzz surrounding Google+ Plus when it came out a couple of months ago, however they weren’t allowing businesses to set up profiles back then. Well, as of this week, Google+ Business Pages can now be created. FSN is here to help you set up your own Google+ Business Page. Please read over this post carefully to make sure Google+ is right for you.
Advantages of Google+ (Plus) For Your Business
I know exactly what you’re thinking… “I have a Facebook Page, why on earth do I need a Google+ page too??”
 To be honest… there aren’t a whole lot of reasons for florists to use this new social network, except for one big one: It’s Google. Google is by-far the main search engine people use when looking for something online. Listing your business information on Google+ very well could boost your rankings. There is currently no way to know for sure, but I could definitely see your Google profile and G+ Page being connected together in the future.
Remember: the key to social networking is being where your audience is; this is likely not Google+. While tons of people signed up for Google+ in the beginning, the activity level began sinking fast. With the addition of Business Pages, this may change, but for now Google+ is full of tumbleweeds.
Advice on Getting Started With Google+
- My advice to you is to join Google+ as a user and see how many friends, family members and acquaintances add you to their circles. This will give you a good indication of how many people you know are using Google+.
- Go ahead and set your business up on Google+ and see what sort of activity it generates. This will also tell you how much time to invest in this new social network. That way if Google+ does end up taking off as a network, you’ve already got a jump start and claimed your business’ name. (And who knows, it just may help to elevate your rankings! *fingers crossed*)
Setting Up A Google+ (Plus) Business Page
Setting up your business page is actually pretty simple, just follow along with the images below.
- Step 0 – If You Do Not Have A Google+ or Gmail Account
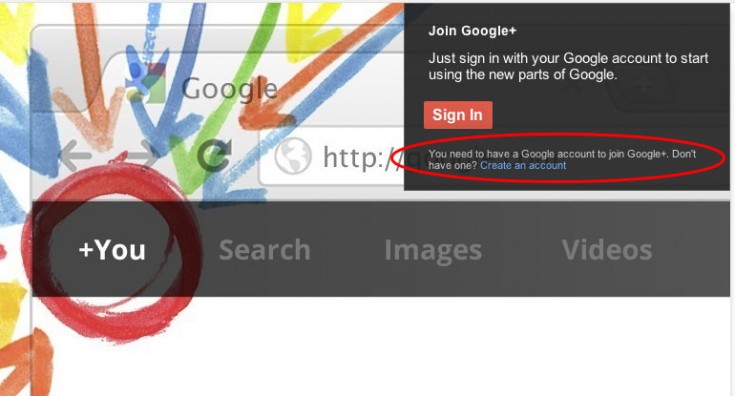
If you do NOT have a Google+ account or Gmail account, you will need to set one up for yourself first. (If you do have one, you can skip this step.)
When you go to the page to set up your Business account you might see the image above. If you have a Google account, click ‘sign in.’ If you do not, click ‘Create an account’ and follow the steps. When you are done, come back to this page and it should look like the image below.
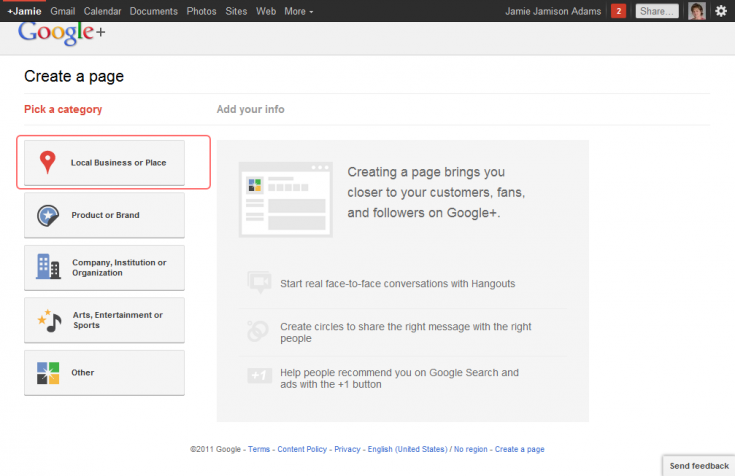
- Step 1 – Creating The Page
First, go to the Create A Page section of Google+ and choose “Local Business or Place” from the choices on the left.
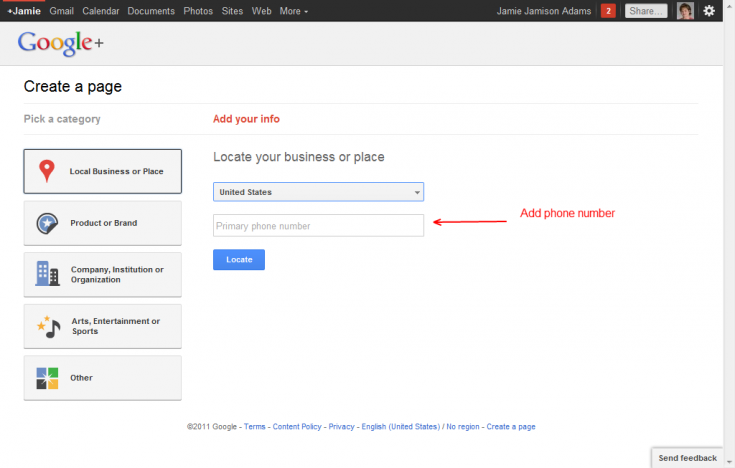
- Step 2 – Locate Your Business
Next, choose your country and enter your phone number in the box. Google will pull up the local listing it already has for your shop, if possible.
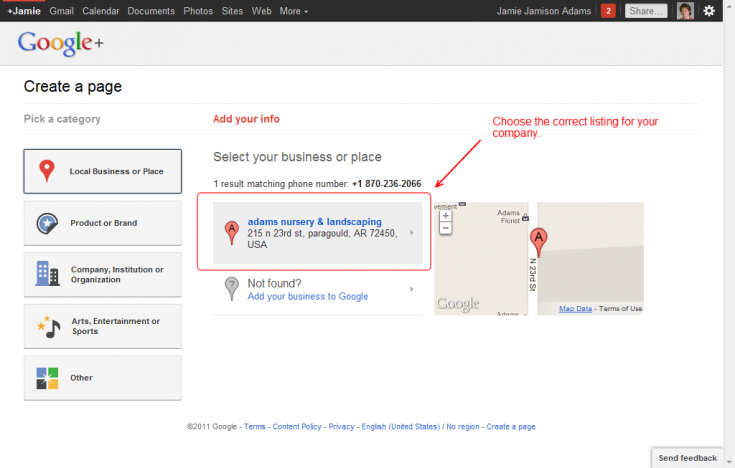
- Step 3 – Your Google Places Page
More than likely, Google will find your local listing and display it as a choice on the next screen. If you have not claimed your local Google listing, you can do so by clicking “Add Your Business To Google” and following the steps.
- Step 4 – Creating A Page
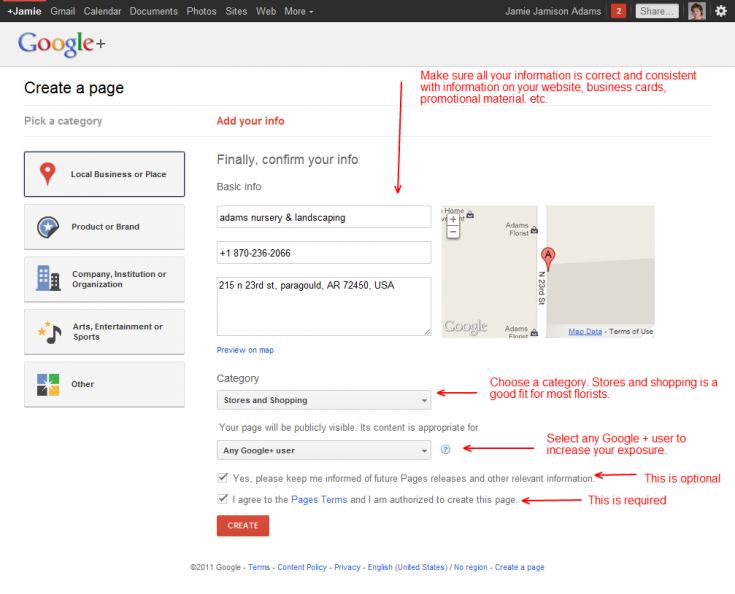
Here you will make sure your Basic info is correct.Make sure your info is consistent and matches whats on your website and online profiles. Below the basic info, you can choose a category for your business. The category Stores and Shopping is a good fit for most florists. The next option ask you what age of users can see your Page; choose Any Google+ user to increase exposure. Check or uncheck the last options on this page and click “Create.”
- Step 5 – Profile Photo
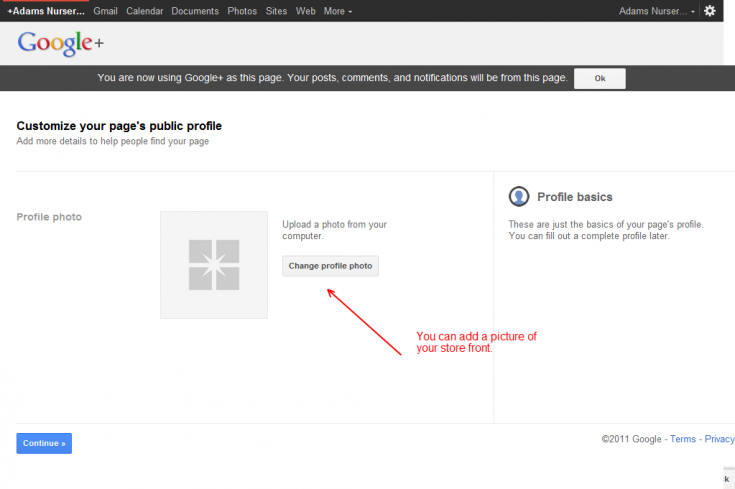
For this step, you will upload a profile photo. Click ‘Change profile photo’ to find a photo from your computer.
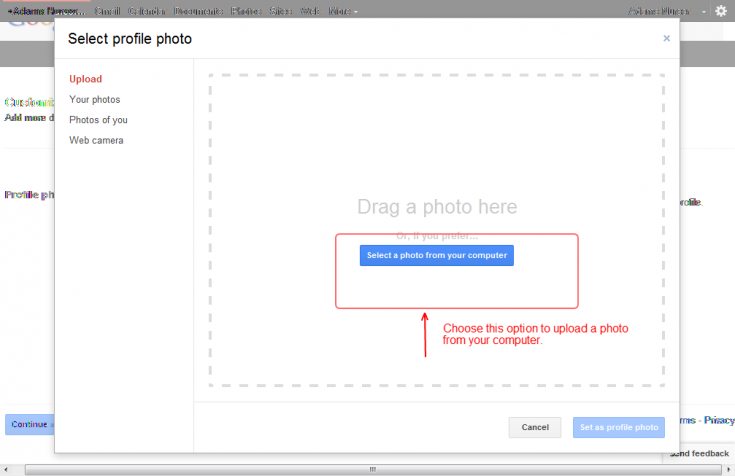
This window will pop up and you will be able to drag a photo to the dotted box, or click ‘select a photo from your computer’ and browse through your files. We recommend you use a picture of your shop’s store front or logo.
- Step 6 – Get The Word Out
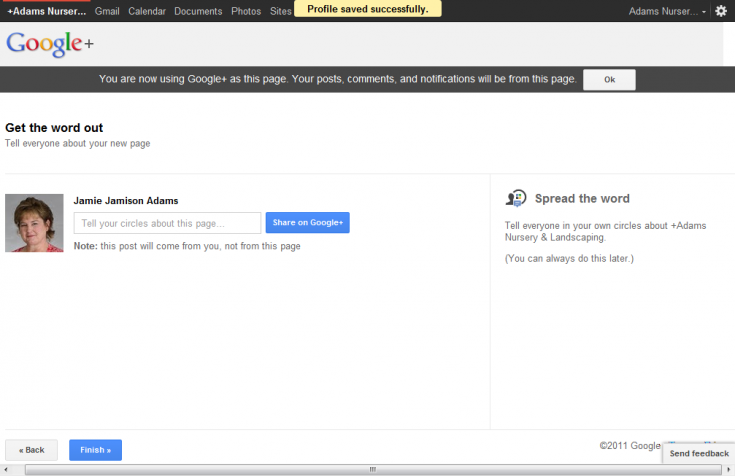
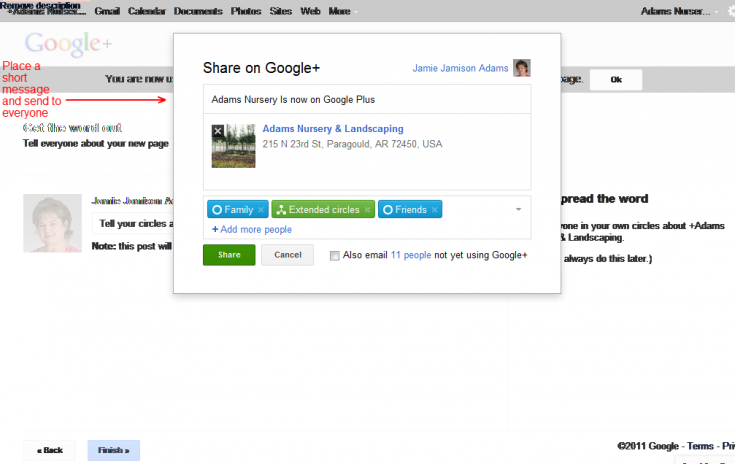
This last area you can tell your friends on Google+ about your new Business Page. Choose which circles you want to share your Page with, if you have no circles created, choose Public.
You can type a short message to go with your new post.
- Step 7 – Your New Page
Google+ Pages work similar to Facebook Page where you can use Google+ as your page. Notice the small box pointing to your profile picture that says “Use this menu to choose whether you’re acting as your Google+ Page or yourself.” This little drop down is where you can switch between yourself and your new Page. And, as far as I can tell, the only way to ‘log in’ as your page.
So whenever you want to do something as your Business, make sure your business profile photo shows up with your Business Name on the left side. If you want to go back to using Google+ as yourself (Not your Page) choose ‘You’ from this drop down menu.
Now What? What to do with Google Plus as a business.
If you just completed the last step above, you are on the “Get Started” section. (You can come back to this page by clicking Get Started under your profile photo.)
Posting to your Page
Your first option is “Post on your Page.” This can be a status update, a photo, a link, anything — Very similar to Facebook. Let’s start by creating a status that says something like, “We are excited about our new Google+ Page!” By default, this post will be Public for all to see, but you can choose specific circles to send these updates too. (More on circles in a sec.)
Connect your website
Back to the Get Started page, the next option is Connect your website. This is optional, and a little advanced. All this does is place a link to your Google+ Page on your website. On the “Get the badge” you can choose what size icon and copy the code. If you know how to copy and paste code into your website, you can do so here. Again, this is totally optional! (ATTN FSN members with websites: We will be adding a Google+ badge to the social media options of your side bar soon, just like your Facebook and Twitter icons, so really you don’t have to worry about this now.)
Tell The World
The tell the world section of the Get Started page gives you the web address to your new Google+ page. It looks like this: https://plus.google.com/106033290155754834637 This is the link you will use to promote your new Google+ Page. Share it on your other social networks!
Understanding The Menu
At the top of your page you will see the Google+ menu. (Circled in the picture above)
- The little house icon is “Stream” and is like your Facebook News feed. It shows the new statuses and updates of all the people in your circles.
- The little Polaroid icon is for “Photos.” Here you can add new photos to your Google+ Profile.
- The little circle with a face icon is for “Profile.” This takes you to your shop’s Profile, this is what visitors will see when they come to your Google+ Page. When you click here and go to your Profile, you will see a red button that says “Edit Profile” here you can add your business information and links to your website or other links.
- The two circles icon is for your “Circles.” On Google+, your circles are your friends.
Circles
Friends can be grouped anyway you want in circles. Once people add your page to their circles, you can add them back. This is where it gets a little tricky, but bare with me, we can do this! If you just started on Google+ you may not have anyone to put in your circles for now. Send the link to a friend (Tell the World section) who uses Google+ and have them add your shop to their circles. Now when you click the two circles icon, you will see “People who have added you” You can add them back by dragging them to whatever circle they fit in, or make a new circle. To add someone to a circle, you click on their face and drag them to the circle you want them to be in.
Note: As a page, you cannot add a regular person’s profile to your circles without them adding you first. You can add any business page to your circles at any time.
Let’s Make Some Friends On Google+ Plus
Now let’s make some friends on Google+ Plus. Try adding someone to your Circles.
Add us to your circle, here’s how: Go to Flower Shop Network’s Google+ Plus Page and find “Add to Circles” in the top right corner. Here you can choose which circle to add us to, or create a new circle. This is a good way to keep friends, customers, wholesalers, industry leaders etc grouped together. It’s up to you how you organize it.
Welcome to Google+Plus
Don’t be surprised if your new Google+ Page gets few circle adds. Unless you live in a big city, your Google+ Page may take a while to grow. Try to post a new status once a week or share a shop sale or promotion. (You never know when these will start showing up on your Google Local Profile) Keep an eye out for other business or organization pages in your community to add to your circles.
Just remember, focus the majority of your social media time and efforts on your biggest audience. Facebook, Twitter or Google, choose what benefits your business the most.
We wish you the best of luck; if you have any questions at all, leave them in the comment section below!


 Find Your


Speak Your Mind